2015-03-14
How to add an app to an existing site
/blog/2015/03/14/add-app-to-site/
Let’s say you have set up a site with one app (e.g. owncloud), as it is described in
Setting up your first Site and App. What if you’d like
to run a second app at the same site, say selfoss?
Short version:
% sudo ubos-admin showsite --siteid <siteid> --json > site.json
% vi site.json
% sudo ubos-admin deploy -f site.json
where in the second step, you add a second entry into the appconfigs array with
the app you want, the context path where to run, and a unique appconfigid, like this:
"appconfigs" : [
   {
      "appconfigid" : "ad0f6fd80220f609ebd1f4f7222ed804b5dea10d4",
      "context" : "/owncloud",
      "appid" : "owncloud"
   },
   {
      "appconfigid" : "ad0f6fd80220f609ebd1f4f7222ed804b5dea10d5",
      "context" : "/selfoss",
      "appid" : "selfoss"
   }
]
Warning: Do not change the appconfigid of your existing app installation,
otherwise UBOS will think you want to delete the old app installation and all its data, and
create a new one from scratch.
Long version:
Of course, you could use sudo ubos-admin createsite to run the second app
at a second site, but that would mean you would need to use a second hostname.
Sometimes that is useful: for example, Jack and Jill, who use the same box running
UBOS, could have their separate sites jack.example.com and jill.example.com
on the same box, with different (or the same!) applications installed while keeping their
data separate. But that requires DNS configuration so the hostname resolves correctly,
is more complicated to set up, and doesn’t make much sense for a single user.
Instead, let’s add a second app to the existing site. First, we look at what’s installed on our device already. (This is an example, depending on what you have installed, what you see may be different.)
% ubos-admin listsites
Site: * (s1bdfd3ea4bba1b5615a74db7991d839a2eecfc2c)
    Context:           /owncloud (ad0f6fd80220f609ebd1f4f7222ed804b5dea10d4): owncloud
We see that we currently have one site at the wildcard hostname, i.e. it responds
whichever way it was reached from the browser, such as http://ubos-pc.local/ or
http://10.0.3.15/. We also see that app owncloud is currently
installed at context /owncloud.
Let’s try this out: if we go to http://10.0.3.15/, we see this screen:
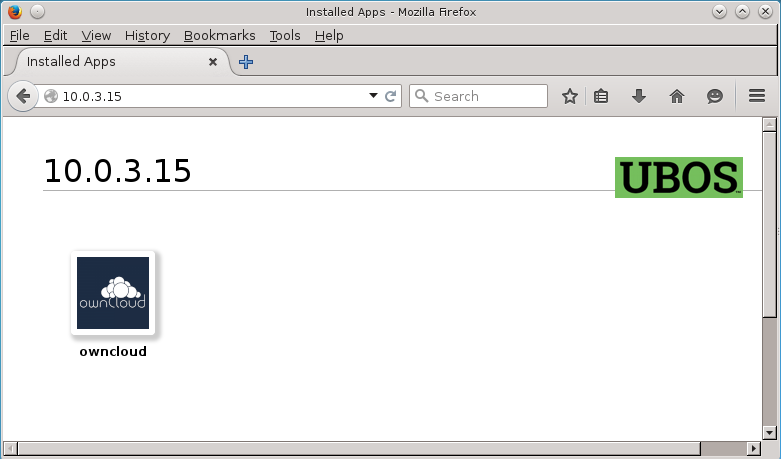
That’s right: the site responds to the entered IP address, and it shows a single icon
for the single app that’s installed (owncloud). If we hover the mouse over the icon,
we can see it is accessible at http://10.0.3.15/owncloud, per the context
field above.
What we really want to do is add a second icon to that screen which leads to a second app.
UBOS doesn’t currently have a nice command for doing this. (See bug report – want to help?) But editing the Site JSON itself it isn’t that hard either. Do this:
% sudo ubos-admin showsite --siteid s... --json > site.json
This command “shows the site”, in “–json” format, but instead of printing it to the
terminal, saves it to a file in the current directory called site.json. This
is your site’s Site JSON file, which contains
your site’s complete configuration. (When you said sudo ubos-admin createsite when
you created the site, all you really did is create that file.)
Let’s edit this file. Use your choice of editor, like vi, or copy the file
from your UBOS box to a PC where you have an editor you like. Just make sure that
you keep the file a pure text file, and don’t accidentally convert it to Word or
rich text, or such!
One caveat: if your site is an SSL site, you cannot use vi to edit the Site JSON
because it cannot handle the very long lines from the certificate. UBOS currently doesn’t
include an editor that can (see bug report),
so you need to edit the file on some other box. Sorry about that: beta4 will include
vim.
Look for the section named appconfigs: it lists all the apps currently installed
at the site. If you are not familiar with JSON: right after the colon after appconfigs,
the section starts with a [ and ends some lines down with a ]. In between, right
now, there is one entry that starts with { and ends with }. It may look like
this:
{
   "appconfigid" : "ad0f6fd80220f609ebd1f4f7222ed804b5dea10d4",
   "context" : "/owncloud",
   "appid" : "owncloud"
}
It basically says “there is an app with an identifier owncloud and it runs at context
/owncloud. You will recognize these values from what you typed into ubos-admin createsite.
It also has a long, basically random number as identifier. Now we add another section, so the
entire appconfigs section looks like this:
{
   "appconfigid" : "ad0f6fd80220f609ebd1f4f7222ed804b5dea10d4",
   "context" : "/owncloud",
   "appid" : "owncloud"
},
{
   "appconfigid" : "ad0f6fd80220f609ebd1f4f7222ed804b5dea10d5",
   "context" : "/selfoss",
   "appid" : "selfoss"
}
Note there is a comma between the two sections, and note that the appconfigid
in the second section must be different from the first. You can make the second appconfigid
any identifier you want, as long as it is unique. The context also needs to be different,
so the apps respond to different URLs.
Warning: Do not change the appconfigid of your existing app installation,
otherwise UBOS will think you want to delete the old app installation and all its data, and
create a new one from scratch.
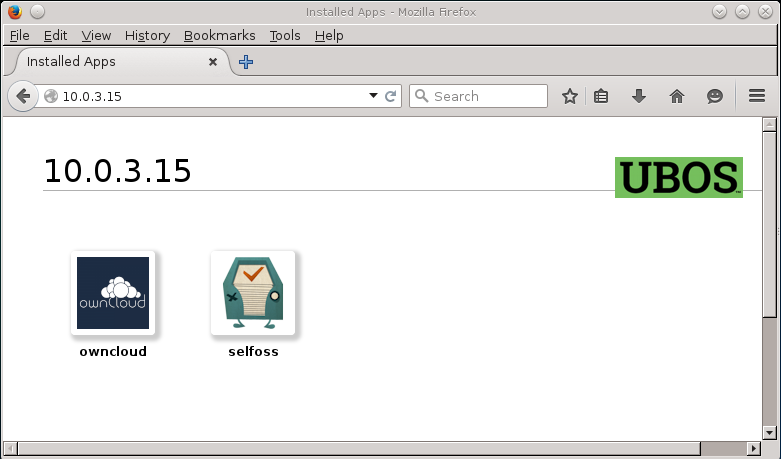
Now save the file back, and run:
% sudo ubos-admin deploy -f site.json
This takes a little bit for installation. Then, refresh your web browser. Voila, here we are:
Note that you can use the same approach to make other kinds of changes to your site.
Simple export the Site JSON with ubos-admin showsite as above, make the changes you
want to see, and redeploy with ubos-admin deploy.